
Adding your WebMail account to your iOS Device
This guide will show you how to add a WebMail account to your iOS device. There are a few things you would need to ensure this works out. They are:
- An active internet connection.
- Access to the cPanel of the domain of the emails. If you want to add mail@domain.com, you will need to have access to the cPanel of domain.com and
- Access to the phone’s settings area.
There are three stages to adding your email to your phone:
- Obtain the server connection settings
- Accessing the phone settings
- Inputting the right information in the right places
Obtain the Server Connection Settings
To get this information, you will need to log into your cPanel console by typing domain.com/cpanel in a browser connected to the internet. This will open a page prompting you for a user name and password. Enter your credentials and click “Log in”

Once you’re in, Look for the “Email Accounts” icon and click on it.
![]()
This will display a form to add new emails as well as all your current emails.

Pick a random email address on the list and go to the far right of the email address’ row. Click on the button that says “More”. This will reveal a drop-down. Then click on “Configure Email Client”.

Scroll down to the “Manual Settings” section. The information you will require is the text in the grey box titled “Secure SSL/TLS Settings (Recommended)”. Keep this page open, you will need to reference this information and input it in your phone. Note that this information mat vary from domain name to domain name, so make sure you use the settings that are associated with your own domain name and email address.

Accessing the Phone Settings
Next, you will now need to tell your phone how to access the email servers and which email address exactly it should be obtaining emails from. You will need to access the Settings page of your phone. Tap the Settings icon – shown in the diagram below, within the red box.

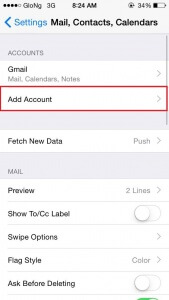
Tap on the “Mail, Contacts, Calendars” menu item

tap on “Add Account”
and tap on “Other” at the bottom of the page.

Under “MAIL”, tap on “Add Mail Account”

Inputting the right information in the right places
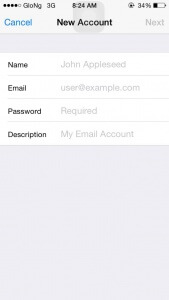
The next screen that will be displayed will request for your name, email address, your email address’ password as well as a description for the email you are adding to distinguish your email account from others you may have on your phone.
On the next screen, make sure you tap the “IMAP” tab – it should now have a blue background and white fonts when activated. The Name, Email and Description should carry over from the other screen, you don’t need to change them.

Next, fill out your “Host Name” and “User Name” under the “INCOMING MAIL SERVER” section. Your host name is the Incoming Server value you got from the Obtain the Server Connection section above.
- User Name: this is your full email address (for example, mail@domain.com)
- password: this should come automatically from the previous screen so you don’t need to change it
- Host Name: this will be the “incoming server” since we are filling out the incoming server page. You get that value from the Obtain the Server Connection section above.
For the “OUTGOING MAIL SERVER” section, use the following
- Host Name: this will be the “outgoing server” since we are filling out the incoming server page. You get that value from the Obtain the Server Connection section above.
- User Name: this is your full email address (for example, mail@domain.com)
- password: this should come automatically from the previous screen

Once you are all done, make sure the values are correct (especially the server value – it’s quite long and unusual) and then tap “return”. During verification, you will be prompted with an inability of your phone to verify the “Server Identity”. Nothing to worry about, just tap “Continue”

On the next screen, you will see your email listed on the mails list. Tap the email account with the description you used earlier

Once the next page loads, you will see your emails from your Webmail, if you have any.

Congratulations! You can now receive and send emails from your iOS device.


